Stencil brushes are often spherical and have lots of tightly packed bristles with a flat edge at the backside. If you don’t have spray adhesive, you should use tape to carry the stencil in place as a substitute. You will must be a bit more careful as you might be stenciling although, since your stencil will be a bit more more likely to move around. Just spray the again of your reusable stencil with a thin coat of repositionable spray adhesive, then stick it in place on prime of your doormat. As you place it on the doormat, make sure that it is centered, straight, and positioned the place you want it. One of my prime stenciling tips is to make use of repositionable spray adhesive to adhere your stencil to the surface your are painting. Flex Seal’s primary benefit is that it is rather more durable than paint alone which is important for a doormat.
Seasonal doormats made with Flex Seal are more probably to final a lot of vacation seasons. However, I do assume making use of warmth switch vinyl with a hairdryer (to shrink it to the mat) would help the stencil keep in place. Once the design is sized appropriately, choose all layers and click “Attach.” This will ensure that your design might be reduce as one piece. You’ll see the “Detach” possibility after you have hooked up your layers. You’ll know it’s labored if the vinyl is tight and you can see the texture of the doormat by way of the vinyl. Use one hand to carry the vinyl in place and the other hand to tug off the transfer tape. Keep observe of the insides of the letters, they will get lost.

The doormat will finally accumulate sufficient mud and filth, although, to render it ineffective. You’ll stand a a lot larger likelihood of keeping all that mess outside and out of your house when you make it some extent to clean it incessantly. Thirdly and finally… think about how this mat seems like aesthetically speaking! It’s always nice to see some creativity going into something we use so frequently.
DIY
Her DIY doormat tutorial video does an epic job of demonstrating tips on how to make a custom doormat with Flex Seal. The Oramask 813 stencil vinyl is for any stencil tasks. But freezer paper is more economical and if you’re looking for a cheaper choice that could be better for you. Both work, it just is dependent upon what you want to use. If you determine to make use of freezer paper be certain to minimize with the shiny facet up and that your mirror your design. When you place your freezer paper stencil on the mat you’ll need to make use of an iron (or your Cricut Maker 3) to heat the stencil so that it’ll adhere to your mat. Learn the way to get an adorable DIY doormat to create the right layered look for your front porch decor.
What Paint Brush to Use To Paint a Basic Doormat
Natural fiber doormats are easily broken by harsh cleansers and cleaning brokers. If you notice areas of tough stuck-on dirt or stains, you’ll have to depend on water to remove them. When treating a mat for lingering scents, sprinkle it with baking soda and let it lie for 10 to 15 minutes before vacuuming it up. Adding water is the following step if your doormat continues to be soiled.
Read more about door mat here. I’ll be sharing my idea and methods for getting amazin result. You can take a look a the ful how-to particulars for making this buck-ish magnificence over on RealSimple.com (here’s the primary web page and here’s the second page). It’s principall an eas project involving a chea Ikea doormat, some painters tape, some outdoor-approved (or enamel) spray paint, and about ten minutes of your time.
Think of these mats as “transitional” — their job is to catch any lingering particles, to not scrape off all of the dirt. To end the doormat, you’ll screw an anti-skid pad on the bottom of every corner. This won’t only assist forestall it from slipping however will also lift the doormat as much as enable the water to empty out. And for extra assist, connect two thin items of wooden along the back. Make certain the piece that you’re using just isn’t as thick as your anti-skid pads. You’ll want to apply the stain stepping into the same course because the grain. It provides the wood somewhat warmth and color whereas maintaining it light and impartial.
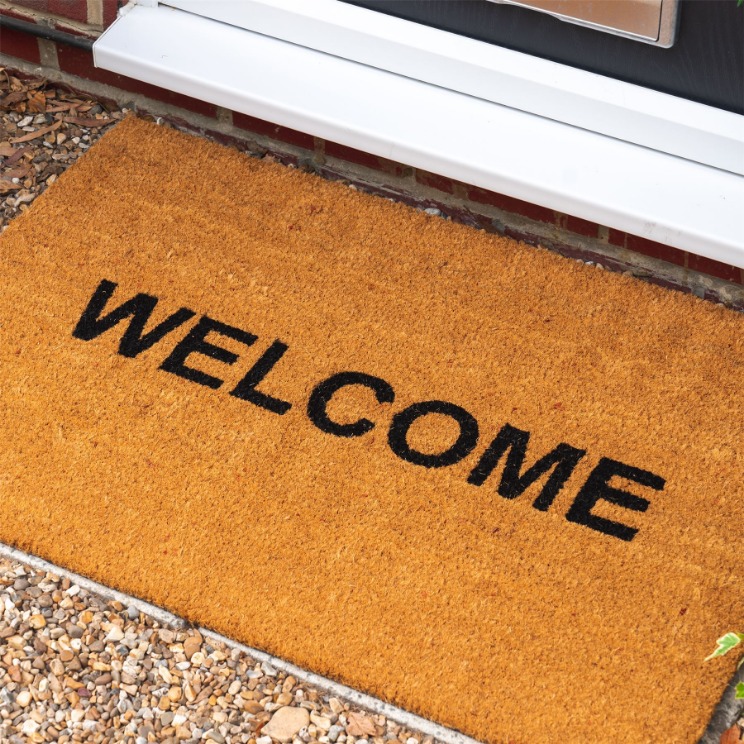
It is a challenge to get anything to stay to these coir mats. All three stencil supplies required further work and creativity to get them to remain in place. In the end, I determined to do my last design using a vinyl stencil. Here is my pro/con list for every of the materials. A commonplace doormat is eighteen x 30, so you’ll have a bit of room on both facet of your design however you probably can at all times reduce separate stencils and create a design across the edge. Coir doormats have brief, powerful, bristles, manufactured from pure supplies similar to coconut, which makes them perfect to catch filth earlier than it could enter your house.
The biggest advantage to using a vinyl stencil is one side can stick on to the surface you are stenciling. This helps hold the stencil in place as you’re employed. Before I get into the step-by-step tutorial, I wish to share a few tips for choosing the right materials.
Leave a Reply